Using HAProxy as a load balancer
HAProxy stands for High Availability Proxy which is a TCP/HTTP load balancer and proxy server. Basically what it does is distributing the incoming load to a different server so that request doesn't saturate in a single server.
Recently, I came with a problem, where the server was hit so hard that 40,000 rows were filled upon in an hour which means 40,000 requests in a row(not including invalid requests). This made the situation worse since the server handling such a request means not being able to handle all the requests properly. So, a friend(https://librenepal.com) suggested me to use HAProxy.
That was the perfect solution to the problem I was facing. HaProxy as a server takes all the request and distribute to different servers depending upon request based on the load balancing algorithm.

The above diagram shows how are we going to install the HAProxy Server. The proxy server will be listening to port 80 and distributing its request to the servers on port 8081 depending upon the load balancing algorithm we set in the proxy server.
The installation was pretty simple:
sudo apt-get install haproxy
The configuration file is available at
/etc/haproxy/haproxy.cfgglobal
log /dev/log local0
log /dev/log local1 notice
chroot /var/lib/haproxy
stats socket /run/haproxy/admin.sock mode 660 level admin
stats timeout 30s
user haproxy
group haproxy
daemon
# Default SSL material locations
ca-base /etc/ssl/certs
crt-base /etc/ssl/private
# Default ciphers to use on SSL-enabled listening sockets.
# For more information, see ciphers(1SSL). This list is from:
# https://hynek.me/articles/hardening-your-web-servers-ssl-ciphers/
# An alternative list with additional directives can be obtained from
# https://mozilla.github.io/server-side-tls/ssl-config-generator/?server=haproxy
ssl-default-bind-ciphers ECDH+AESGCM:DH+AESGCM:ECDH+AES256:DH+AES256:ECDH+AES128:DH+AES:RSA+AESGCM:RSA+AES:!aNULL:!MD5:!DSS
ssl-default-bind-options no-sslv3
defaults
log global
mode http
option httplog
option dontlognull
timeout connect 5000
timeout client 50000
timeout server 50000
errorfile 400 /etc/haproxy/errors/400.http
errorfile 403 /etc/haproxy/errors/403.http
errorfile 408 /etc/haproxy/errors/408.http
errorfile 500 /etc/haproxy/errors/500.http
errorfile 502 /etc/haproxy/errors/502.http
errorfile 503 /etc/haproxy/errors/503.http
errorfile 504 /etc/haproxy/errors/504.httpThe global section offers log folder location, setting user and group which is already created while installing haproxy.
and the default section provides additional log levels.
Now to configure the load-balancer, we need two types on nodes frontend and backend.
Add the following lines to /etc/haproxy/haproxy.cfg
frontend haproxynode
bind *:80
mode http
default_backend backendnodeso, we created a haproxynode frontend node which listens to port 80 on http and forwards to backendnodes which we will create now.
backend backendnodes
balance roundrobin
option forwardfor
http-request set-header X-Forwarded-Port %[dst_port]
http-request add-header X-Forwarded-Proto https if { ssl_fc }
option httpchk HEAD / HTTP/1.1\r\nHost:localhost
server node1 10.21.21.1:8081 check
server node2 10.21.21.2:8081 checkhere the backend node name backendnodes uses round-robin technique for request distribution. round robin uses distribution based on the weight of the server. the request is forwarded to two servers on ip 192.168.2.3 on port 8080 and also health check is done to ensure the servers are running.
We can also view stats for the loadbalancer using listen node.
listen stats
bind :8988
stats enable
stats uri /
stats hide-version
stats auth someuser:passwordhere, we enabled the stats page on port 8988 which can be accessed from url at ip-address/ and a username and password can be set from stats auth option.
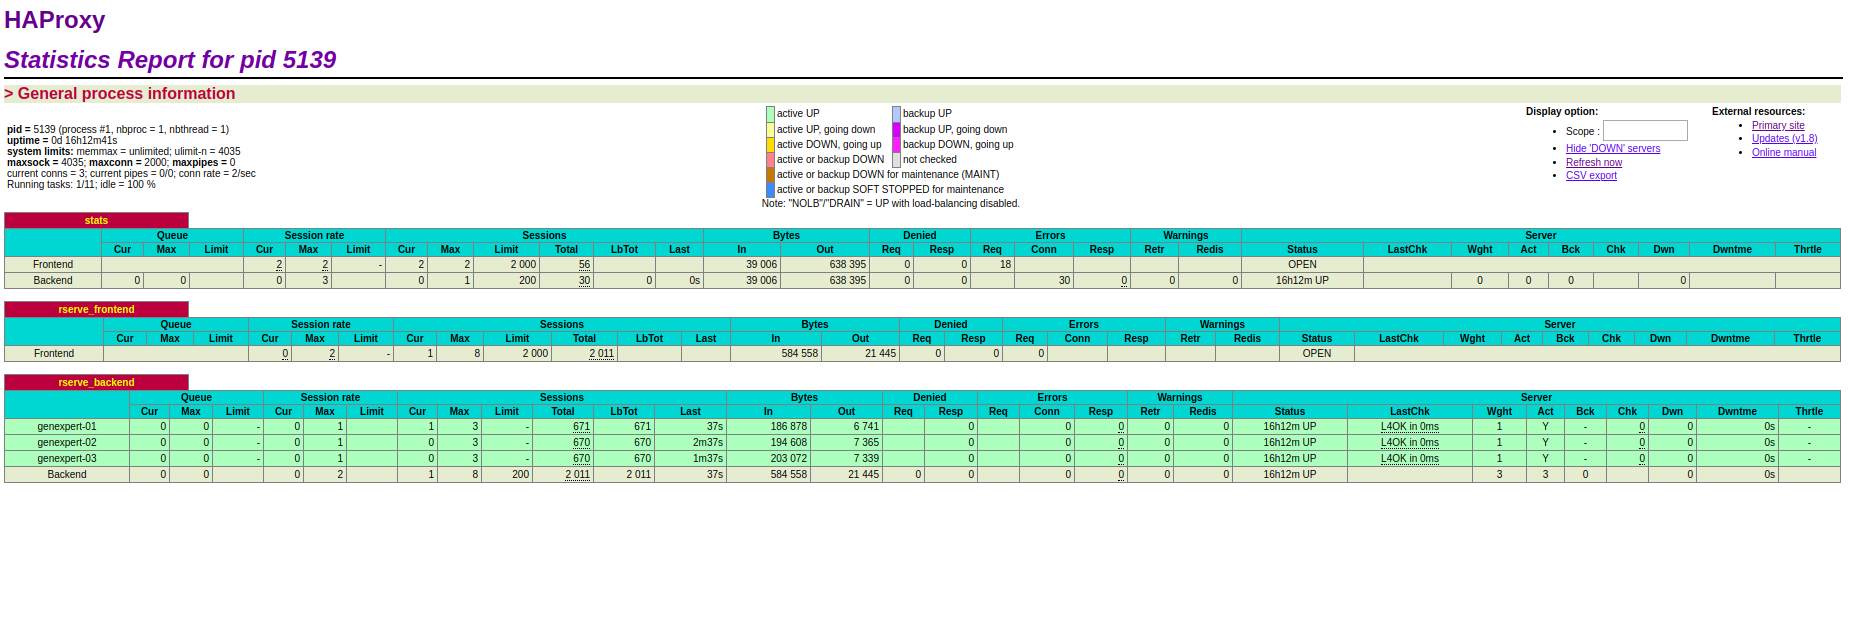
A similar page can be viewed which shows the server stats, current active connections, sessions stats etc.
The final configuration file looks like this
global
    log /dev/log    local0
    log /dev/log    local1 notice
    chroot /var/lib/haproxy
    stats socket /run/haproxy/admin.sock mode 660 level admin
    stats timeout 30s
    user haproxy
    group haproxy
    daemon

    # Default SSL material locations
    ca-base /etc/ssl/certs
    crt-base /etc/ssl/private

    # Default ciphers to use on SSL-enabled listening sockets.
    # For more information, see ciphers(1SSL). This list is from:
    #  https://hynek.me/articles/hardening-your-web-servers-ssl-ciphers/
    # An alternative list with additional directives can be obtained from
    #  https://mozilla.github.io/server-side-tls/ssl-config-generator/?server=haproxy
    ssl-default-bind-ciphers ECDH+AESGCM:DH+AESGCM:ECDH+AES256:DH+AES256:ECDH+AES128:DH+AES:RSA+AESGCM:RSA+AES:!aNULL:!MD5:!DSS
    ssl-default-bind-options no-sslv3

defaults
    log     global
    mode    http
    option  httplog
    option  dontlognull
    timeout connect 5000
    timeout client  50000
    timeout server  50000
    errorfile 400 /etc/haproxy/errors/400.http
    errorfile 403 /etc/haproxy/errors/403.http
    errorfile 408 /etc/haproxy/errors/408.http
    errorfile 500 /etc/haproxy/errors/500.http
    errorfile 502 /etc/haproxy/errors/502.http
    errorfile 503 /etc/haproxy/errors/503.http
    errorfile 504 /etc/haproxy/errors/504.http
frontend haproxynode
    bind *:80
    mode http
    default_backend backendnode
backend backendnodes
balance roundrobin
option forwardfor
http-request set-header X-Forwarded-Port %[dst_port]
http-request add-header X-Forwarded-Proto https if { ssl_fc }
option httpchk HEAD / HTTP/1.1\r\nHost:localhost
server node1 192.168.2.2:8080 check
server node2 192.168.2.3:8080 check
listen stats
    bind :8988
    stats enable
    stats uri /
    stats hide-version
stats auth someuser:passwordFinally,
restart the server
sudo service haproxy restartEnjoy !